Setting up Ghost on your home server and Dynamic IP - 2023 Edition
Look Ma! No Static IP!
In this article, I am going to show you how to self-host a blogging solution like Ghost with a dynamic IP address. The solution applies to pretty much anything served by a web server.
I added 2023 Edition to the title as most guides I've found where a little older and somewhat obsolete.
I use Cloudflare's services, but there are other solutions around. If you don't have a Cloudflare account yet, now is a good time to create one. For testing purposes or hosting a simple blog like this one the Free plan will suffice, providing much needed protection and caching, for free.
Here's a brief summary of what I am going to cover:
- Set up Ghost on Docker using Docker Compose
- Add a Cloudflare Site, with your domain
- Set up a Cloudflare Tunnel
- Have the domain indexed by Google
- Security considerations
I assume you have a domain name available you can use, have Docker and Docker Compose installed and know how to use the command line. If not, this guide is most probably not for you.
Set up Ghost
Ghost can be installed on many platforms in different ways. Here, we will use Docker and Docker Compose using the following YAML file:
version: '3.1'

services:
  ghost:
    image: ghost:latest
    restart: always
    ports:
      - '2368:2368'
    networks:
      - internal_ghost
    dns:
      - 8.8.8.8
    volumes:
      - /home/<USER>/blog/<YOURDOMAIN>/ghostblog/ghostdata:/var/lib/ghost/content
    environment:
      # see https://ghost.org/docs/config/#configuration-options
      database__client: mysql
      database__connection__host: db
      database__connection__user: root
      database__connection__password: <COMPLEX_PASSWORD>
      database__connection__database: db
      mail__transport: SMTP
      mail__from: <YOURNAME>@gmail.com
      mail__options__port: 465
      mail__options__secure: true
      mail__options__host: smtp.gmail.com
      mail__options__service: Google
      mail__options__auth__user: [email protected]
      mail__options__auth__pass: GOOGLE_APP_PASSWORD
      url: https://<YOURDOMAIN>.com

  db:
    image: mariadb:latest
    restart: always
    networks:
      - internal_ghost
    volumes:
     - /home/<USER>/blog/<YOURDOMAIN>/ghostblog/sqldata:/var/lib/mysql
    environment:
      MYSQL_ROOT_PASSWORD: <COMPLEX_PASSWORD>
      MYSQL_DATABASE: db
      MYSQL_USER: root
      MYSQL_PASSWORD: <COMPLEX_PASSWORD>

networks:
  internal_ghost:
    external: true
One of the problems I faced setting up Ghost is that it requires a mail server for new accounts registrations and sending out bulk emails for the newsletter. As of October 2023, the only official integration for bulk emails is Mailgun.
Mailgun used to have a free plan but now it costs 35$/month. As I have no need for a newsletter, I used my personal gmail account to send out emails for new accounts registrations.
A few notes about the YAML file above.
- Uppercase names within angle brackets must be replaced with suitable values. For example, I replaced <YOURDOMAIN> with marcoperetti
- The path for the data and sql volumes need to be modified for your environment. The above works on Ubuntu 22.04, as long as the corresponding directories have been created.
- Replace YOURNAME with your gmail user name
- Generate an app password for Gmail and replace GOOGLE_APP_PASSWORD
- Replace COMPLEX_PASSWORD with ... something else
- Replace YOURDOMAIn with the name of your domain
Save the YAML in a file named docker-compose.yml and copy it to /home/<USER>/blog/<YOURDOMAIN>.
Our Docker network is named internal_ghost, and must be created by running docker network create internal_ghost.
From the <yourdomain> directory, run docker compose up -d
The first time it will take some time as it needs to download the necessary images. Before moving to the next step, I suggest you check that Ghost has been set up correctly by checking the logs.
Run docker ps to obtain the container IDs, and then docker logs <container id> to see the logs. There should be no errors.
Add a Cloudflare site
In order to set up a tunnel we must first add a site.
Log on to Cloudflare and click on Add a site from the dashboard. You will be requested to either provide the name of an existing domain name, or register a new domain directly from Cloudflare. As I had mine registered on Namecheap.com, I entered the name and clicked on Continue.
At this point you will be presented with the different plans. Chose what makes sense to you, but for testing purposes or personal blog sites the Free plan will suffice.
Cloudflare will then copy over the existing DNS configuration, and will provide suggestions. I am assuming the domain is not used for anything else, and most records can be discarded. You may want to keep the TXT records.
Note: If you are unfamiliar with DNS and are using the domain for other purposes, I suggest you proceed with extreme care, or not at all. I cannot guess your configuration and cannot take any responsibility for any misconfiguration, nor help you in case you screw it ip.
If you decide to proceed, click on Continue and you will be asked to change the DNS Servers to Cloudflare's. On Namecheap, select the domain from the dashboard, select "Custom DNS" from the Nameservers section, and add the names provided by Cloudflare. Click on Done, and wait for the changes to take effect.
Note: there is no need to transfer over the domain to Cloudflare. If you wish to do so, follow these instructions.
If all goes well, you should see in the dashboard that your Cloudflare site is active as shown below.

Set up Cloudflare Tunnel
You now have to decide how to make your Ghost server instance accessible to the public internet. This could be achieved by installing NGNIX, generate LetsEncrypt certificates, and opening port 443 on your router.
The alternative, is to use Cloudflare Tunnel, which takes care of tunneling traffic, without the need to open any port. Cloudflare Tunnel requires the deployment of an agent on your server, and we will see shortly the various options.
From your site dashboard, click on Access to access the Cloudflare Zero Trust site. Once there, select Access from the left menu, then Tunnels. There you will see the list of Tunnels and the option to create a new tunnel.
Click on Create Tunnel and give it a name. Once Saved, you will be presented with the instructions to deploy the agent, as shown below.
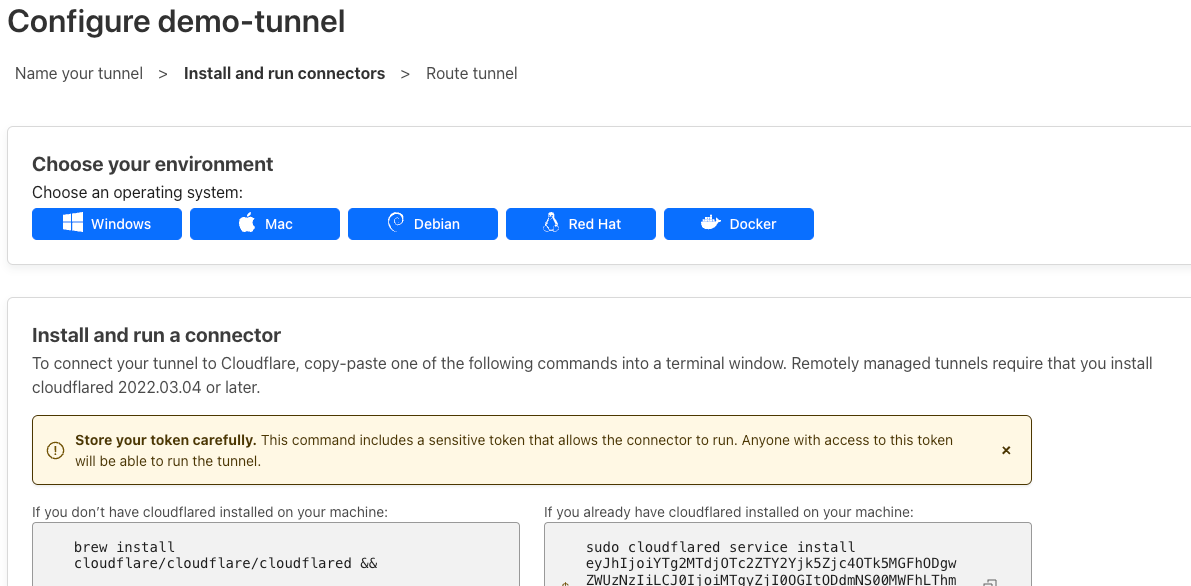
Install the agent on the computer running Ghost and then click on Next to set up the route, that is, how the traffic from your public hostname (the domain) will reach Ghost on your server.
As we will be serving the blog from the root domain, it should look like the one below.

If all goes well, the tunnel's status should be HEALTHY

In your DNS records, you should see a new CNAME record, which links the root domain to the tunnel.

You should now be able to access your Ghost instance from https://yourdomain.com
The last step is to redirect www to your root domain. Follow this simple guide and you should be set. Just remember that it takes time to propagate DNS changes and it may not work immediately - be patient and give it some time to propagate.
If you have never used Ghost before, you need to begin by accessing the admin portal under https://yourdomain.com/ghost. Follow this guide for additional details on first-time settings.
I also suggest ensuring that accounts signup work. Subscribe as a regular user (from the root domain) . Both the user and yourself, the admin, should receive an email. In my case, as there is not much content yet, I decided to disable new users' signup - one less thing to worry about.
So by now you should have your blog up and running, but Google isn't aware of it, and you won't get much traffic, if any at all - well, except malicious traffic, that is.
Have the domain indexed by Google
The tool to let Google know about your web site is the Google Search Console.
You basically need to prove that you own the domain, and you are going to prove it by adding a Domain property from the menu, which will require prof of ownership by means of DNS record verification.
Once verified, you should submit your sitemap, which is basically a url that looks like https://yourdomain.com/sitemap.xml, and Google will add it the queue of sites to be crawled.
Security Considerations
Self-hosting is not without risks, even for a well locked-down environment. Here are some basic suggestions to get you started:
- Ensure that Docker is not running as root.
- Secure the /ghost admin panel with Cloudflare Teams. I used this guide.
- Consider disabling new users sign-ups.
- Learn how to back-up, upgrade and restore your site.
- Subscribe to Ghost Changelog newsletter to be notified abut product updates
Happy blogging.